Showing posts with label let's get crafty. Show all posts

Tuesday, February 14, 2017

Go Spread Love

My Dear Readers,
I'm sending you love
Texas-sized, sparkly love.  
From my home to yours.


It's LOVE Week! It's LOVE month! Even if you don't have a "Special Lady" or "Special Mister," it's no matter. Surely there is someone (ANYONE) who you love and someone who loves you. This is a great time to send them a 😘 text, a card via snail mail with glitter in the envelope (it's not too late, it's never too late), a 💖 posted on their Facebook page, or an extra long hug. You might even consider leaving a comment on a blog post (hint,hint.)


Send love to people (and animals) who really need a reminder that they matter: refugees, foster children, sick kids, the impoverished or homeless, injured veterans, abandoned animals, lonely old folks, and grieving families to name a few. Give a smile, money, hugs, prayers, your time, your gently used clothes and homegoods, and/or notes that say you care. Pick up garbage that you didn't leave to love our verdant planet. Practice self-care (NOURISH yourself with dark chocolate, blackberries, green tea, long walks, and bubble baths. Or gratitude-journal writing, time being creative, and 15 minutes sitting in silence so you can hear your soul.) Love yourself and then love others from your overflow! 


And who doesn't love this bunny who is obviously the life of the fiesta?

This world needs more love! So be a love spreader! Spread love like heart-shaped confetti blowing in a 55 mph wind gust. (Biodegradable confetti, of course, because we also love Mother Earth.)

Please keep me posted on ways that you are spreading love this month! 


↣↣↣💘↢↢↢


PS: If you have little ones at home, try this craft with them. It's super easy and fun.

I-Spy Sticker Cards

I save all of the stickers we accumulate (lots of $1 sticker packs from Target, it might be a problem) in a bin and then whip out the bin for projects like this. Just take a notecard and stick, stick, stick away. It's great for fine motor development.

We (and by we, I mean me because God gave me a daughter who is perfect as he made her except that can only sit to do craft projects for 3-8 minutes at a time) made these for some of our little friends that live far away. On the back I wrote: We made you an I-Spy! Can you find.....a strawberry, a squirrel, a teeny skull, and....... What else can you find? I sent the cards in envelopes to keep the stickers from falling off in the mail. A sealant like Mod-Podge would also protect them if you are more inclined to send postcards.


Go spread love Dear Readers!


Saturday, November 30, 2013

Glittering Thanks

A Very Happy Thanksgiving 2013

Here's how we give glitter thanks at our house.
Turkey Craft Number 1: Glam Gobbler
Clockwise from top left:
1. We found the inspiration for our turkey on a window at Beni's preschool.
2. I'm teaching her early- you can NEVER add too much sparkle.
3. Turkey in progress…


And here is our Glam Gobbler making his internet debut:


We were both so happy with how he turned out. He's a keeper for sure.
Turkey Craft Number 2: Sending Gratitude
Clockwise from top left:
1. and 2. Making handprint turkeys with paint and glitter.
3. The finished product says: We are thankful for you.
4. Sending our love to Godparents, grandparents, and beloved aunts and uncles.


Celebrating Thanksgiving at Preschool
Clockwise from top left: 

1. Beni-Bird modeling her Native American headband.
2. The Williams family feather: what we are thankful for.
3. Side view of previously mentioned fashionable headdress.
4. A huge turkey of thanks at Beni's school (one feather contributed by each family.)


Thanksgiving Day Traditions

Clockwise from top left:

1. and 3. Watching the Macy's Thanksgiving Day Parade.
2. Our vegetarian meal.
4. One dessert for each of us. 


A Night of Thanks

Clockwise from top left:
1. Gratitude-themed books.
2. Sitting by the fire for story time.
3. My art journal entry for 11-28-2013.
4. I've been recording blessings in my gratitude journal since 2002.


And one more thing I'm so grateful for…..
 you, Dear Reader.

***
PS: Please forgive the funky formatting and the extra spaces. I swear, it doesn't look like this on my end. I spent over an hour trying to fix it and then decided to publish "as is" before I lose my good feelings of gratitude. What a relief it is to let go of "perfection"!

Thursday, April 4, 2013

Cut and Paste Therapy

Readers, get out your glue sticks. 


It's time for some therapy.


I've written about the meditative benefits of coloring in the past, 
and making collages works just as well. 


Creating in my art journal is an important part of Operation Reclaim sPaRkLe
So after I put my daughter to bed, I grab my glue, plop down on the floor, and get busy.


These are the collages I created this week using only a glue stick, 
Anthropologie catalogs, and my church program. 


Many of you told me you need to reclaim your sparkle too.
So now it's your turn. 
Go ahead, Readers. There's no shame. Get into therapy!


Special thanks to Artsyville, for inspiring me to dig out my glue sticks and go for it.

Monday, February 8, 2010

An update. (And yes, even more glitter.)

It's been a while since my last post.  Since then, I've been focusing on taking extremely good care of myself.  Lots of yoga, meditation, visualization, tea, acupuncture, and even wheat grass shots!  I'll do just about anything to become a fertile Myrtle.

Here's something else I've been up to:


Getting crafty is always nourishing to my soul.  And I love making Valentines.  My two favorite colors are red and pink AND I have an excuse to use hearts with abandon, be extra girly, and use glitter.  (Although I'm pretty much doing that the other 364 days of the year too.)


  This year making Valentines was even more special as my sorority sister, Tracy Duncan, mailed me the above glitter heart set.  It was an unexpected gift in the mail, and it brightened my world.  
(Thank you Tracy.  Delta love and all of mine too.)

You'll have to come back on February 14th to see my Valentine's creations!  Although, some of you just might be getting one in the mail.

Friday, September 25, 2009

Let's Get Crafty: Magazine Stationery


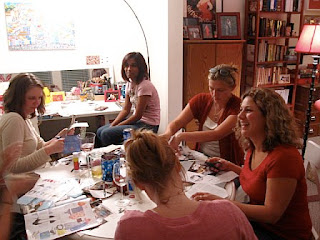
This month was my turn to host Crafty Chick Night. I heart stationery. I also love using recycled materials when crafting, so I choose to make magazine envelopes and coordinating notecards as our project.

Twelve chicks showed up for a night of wine, food, laughs, and creativity.

How can you not be inspired to make your own after seeing
these amazing magazine envelopes made by my fellow crafty chicks?

Materials needed:
1. Magazine(s) (or you can use any kind of paper: wrapping, decorative, etc.)
2. Card stock (buy recycled!)
3. Scissors
4. Glue Stick
5. Envelope template (Steam open an envelope to use as your template. I recommend starting with a small one and go bigger as you get more comfortable).
6. Label paper (to add to the front of the envelope so you can write- and see- a name or address).

Directions:
1. Put your envelope template (the now steam-opened envelope) onto a magazine page. Trace around the edges.
2. Cut it out.
3. Fold the shape back into an envelope. (Sides go in first, then the bottom flap over them.)
4. Glue the bottom flap to the sides with the glue stick. (Be sure not to glue your envelope shut. I recommend putting your hand into envelope to puff it open and then let it dry like that- hand removed, of course.
5. Cut card stock to desired size to fit into envelope and decorate!

Here's Emily, Crafty Chick Night founder and coordinator, showing off her creations.

Tuesday, August 11, 2009

Let's Get Crafty: Repurposed Plastic Bottle Vases


I cannot take the credit for this creation. My new friend, Emily, was kind enough to invite me to her Crafty Chicks Night last week. Repurposing plastic bottles into colorful vases was the project. (I cannot express in words how excited I am to be involved in a monthly gathering of women and crafts. I'm actually giddy.) And the added bonus? This project uses mostly recycled materials. Go Earth!

The directions for the original project were from a fancy magazine, but they turned out to be more than a bit messy and involved mixing glue and water. Why bother? I say, when my trusty Modge Podge will do the job and keep things neat?

So, here are the no-fail directions that even the craft-challenged can master.

Supplies:
1. Plastic bottle
2. Modge Podge (found at any craft store) or similar glue.
3. Glue brush
4. Newspaper cut into strips or torn into pieces
5. Acrylic paint
6. Paint brush (or rinse your glue brush and reuse. That's what I did.)

1. Find a plastic bottle that has a cool shape. Clean it well.
2. Using a glue brush, paint some Modge Podge glue onto your plastic bottle. Cover the glue spot with newspaper. Repeat until the entire bottle is covered with newspaper.
3. Add a second layer of newspaper and Modge Podge. Don't worry about wrinkles in the paper. They actually add texture and interest to your vase.
4. Paint with acrylic paint. (I found that paint in a tube worked much better than paint in a jar.)
5. Seal with 2 more coats of Modge Podge and you're done

Here's me working on the first layer of newspaper. Tell me I don't look beyond excited!

Sunday, August 2, 2009

Let's Get Crafty: Scale & Mirror Signs


Last week I hosted a craft day with two friends and fellow bloggers, Laura and Angela. We made mirror and scale signs.

What are those, you ask? Well, they're signs you post on your mirror or scale to remind you that you're fabulous. If you are like most women I know, you could benefit from a positive affirmation or two. Especially when you're looking in the mirror sans makeup or when you're hopping on the scale.
Even at 34, my main body image issue is blemished skin. So, the sign I made for my mirror reminds me to put those pimples in perspective.

I made the scale sign below for one of my nutrition & wellness coaching clients. Even though I recommend she weigh herself no more than once a week, she does it more frequently. And, like most of my clients, the number on the scale dictates how she then feels about herself. (Don't worry, we're working on changing that. )


To make your own sign:
1. Cut cover or card stock to desired size. (The signs I made are 3" x 3")
2. Type and print your affirmation. Have fun with fonts. Here are a few of my favorites:
-You look fabulous when you feel fabulous.
-Don't let a number dictate how you feel.
-Girl, you are beautiful when you smile.
-Your weight has nothing to do with your worth.
-One year from now, you won't remember this pimple.
3. Decorate your sign and add your positive affirmation.
4. If you want to laminate your sign, use heat and seal laminating pages. (Find them in office supply stores). These work well with irons (you don't need a laminating machine) but be sure to use the included paper pouch to protect your iron.
5. Trim excess laminate from your sign.
6. If you want to add glitter, rhinestones, or other accents, glue these on after you laminate your sign. Laminating doesn't work so well when the project gets too thick.

To hang your sign: you can tape it to your scale or mirror, punch one center top hole and use a suction hook on your mirror, or punch two top holes and use ribbon.

Have fun making these and let me know what you come up with!

Saturday, July 11, 2009

Let's Get Crafty: Personalized Journal

Last week I started a new book entitled, The Artist's Way: A Spiritual Path to Higher Creativity, by Julia Cameron. The book is a 12-week program to nourish my spirit and my creativity. The program includes journal assignments. (Please check back with me in a few weeks to make sure I am on track.) Anyway, here I was excited to get started, and the used bookstore where I bought the book didn't carry journals. And the drug store next door only had standard school composition books (the kind with the black and white speckled covers) and 3-ring notebooks.
Q: What's a girl to do?
A: Buy a standard composition book and get crafty!
Here it is:
All but 4 of the images I used were from magazine pages or junk mail. It's my favorite kind of recycling!

If you want to make your own, in addition to your composition book and magazine pages you will need a glue brush and some glue (My favorite for this type of project is Modge Podge. You can get it at any craft store.) I also put an extra coat of Modge Podge over the art afterwards to keep it protected.

I hope you enjoy this idea. Let me know if it inspires you to get crafty!

Wednesday, June 17, 2009

Let's Get Crafty: Love Sender Note Cards


I’ve had my blog for almost two months, and until now I have not lived up to my promise to get crafty and creative with you. I’ve been posting my words and artwork to inspire you but long ago I discovered that nothing does it for me quite like a fresh sheet of paper, new markers, glitter, and a glue stick. Being creative is so nourishing to the spirit!


I also happen to think that sending and receiving mail is one of life’s great joys. Opening that mailbox and finding a card or letter sent to me “just because” makes my day. Text, email, and even a phone message just don’t have the same emotional impact. I have been fortunate to be on the receiving end of ‘just because cards’ countless times. My sister is wonderful at this.


But, as the saying goes, it is better to give than to receive. And, I am a big believer that what you send out (via the cosmos or US Postal system) comes back to you. Sending out cards and warm wishes through the mail is a little pleasure of mine. Buying and making stationery is one of my things. (After all, I did have a tiny handmade stationery biz at one time.)


The Love Sender stationery embodies this philosophy for me. Plus, it is super cute and super easy to make! Keep reading for instructions.....


Here we go:

(Feel free to take a look at the photo and go for it. You can’t really mess up and, if you are a visual learner like me, the directions just seem to make it more complicated.)

  1. Cut 8” x 11” cardstock into 4 even pieces. Using a paper-cutter is best to get straight and even lines. You can buy precut cardstock if you don’t own or want to invest in a papercutter.
  2. Draw a horizontal rectangle using thin black marker centered on the top of your card. (It doesn’t matter which way you hold the card. Use your preference.)
  3. Draw the envelope flap (a V that comes together below the heart and reaches to the top corners of your rectangle).
  4. Draw the bottom 2 lines of the envelope (from mid-flap to each bottom corner.)
  5. Draw a heart in the envelope flap and color it in with pink or red marker.
  6. Write the words, “Love Sender” below your envelope.
  7. Add glitter to your heart if that makes you feel special. Otherwise, leave it as it is.

You can buy plain white or colored envelopes for your cards. Tying together 6 cards and envelopes together with ribbon, makes the cutest little gift.


Enjoy and let me know what you think!


ShareThis